一:环境准备
1.python3.6
2.windows环境
3.pycharm
4.allure-pytest
5.allure2.8.0
6.java1.8
说明:这是基于allure-pytest库写的,如果需要学习pytest-allure-adaptor库可以参考我另外一个博客:https://www.cnblogs.com/hao2018/p/9915044.html
allure-pytest快速安装
在cmd中输入 pip install allure-pytest,回车
二:报告生成
第1步:下载allure.zip,下载地址:allure-github: https://github.com/allure-framework/allure2 ,找到对应版本,并下载

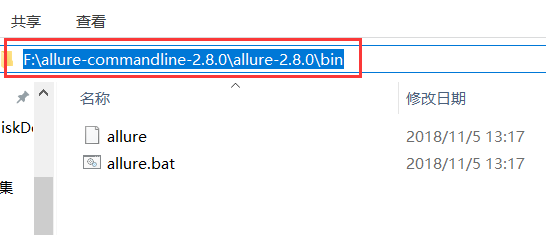
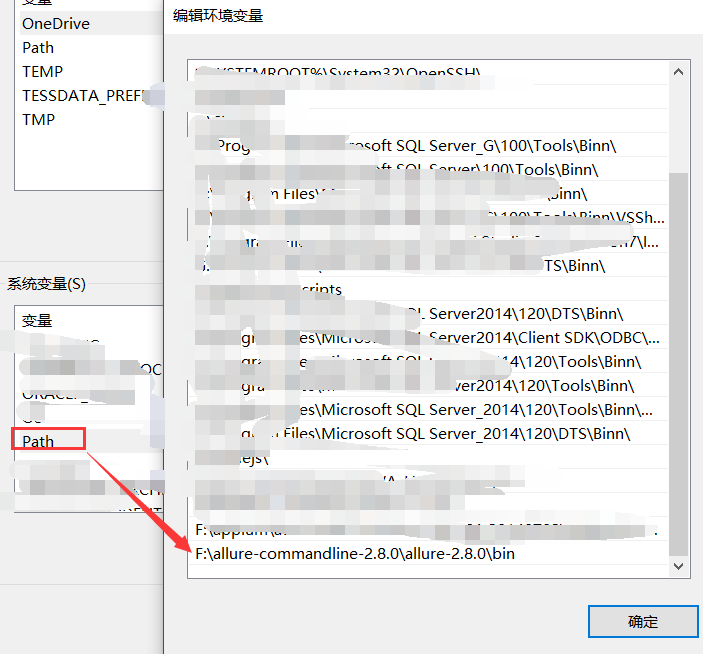
第2步:解压allure.zip,将路径添加环境变量,path中,记得需要重启电脑
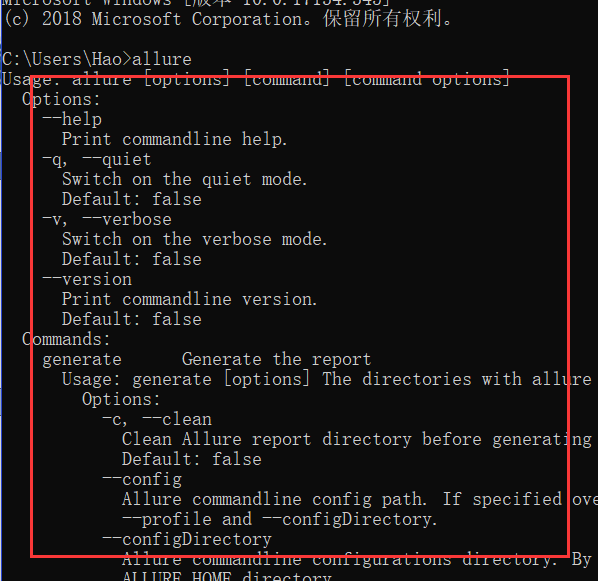
第3步:验证allure,在cmd中输入allure,然后回车,如果可以看到一下,说明配置完成
第4步:运行测试用例 pytest.main(["-m","login","-s","-q","--alluredir=./report"])
"-m": 标记用例
"login": 被标记需要执行用例
"-s":允许终端在测试运行时输出某些结果,例如你想输入print的内容,可以加上-s
"-q"简化输出结果
"--alluredir": 生成allure指定语法
"./report":生成报告的路径
"--clean-alluredir" :因为这个插件库allure-pytest生成的报告文件,你第二次运行时候不会清理掉里面的东西,所以你需要删除这个report文件夹,然后运行重新新建reoprt文件夹
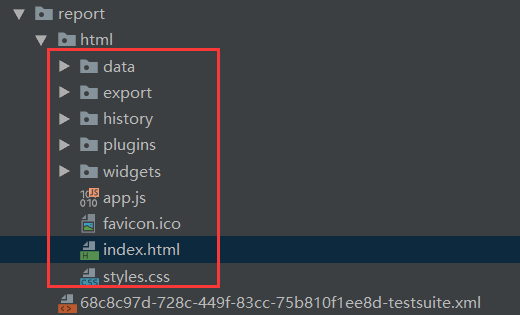
说明:运行后,会在report文件夹里面生成文件
三.allure定制化报告
第1步:一些词语解释
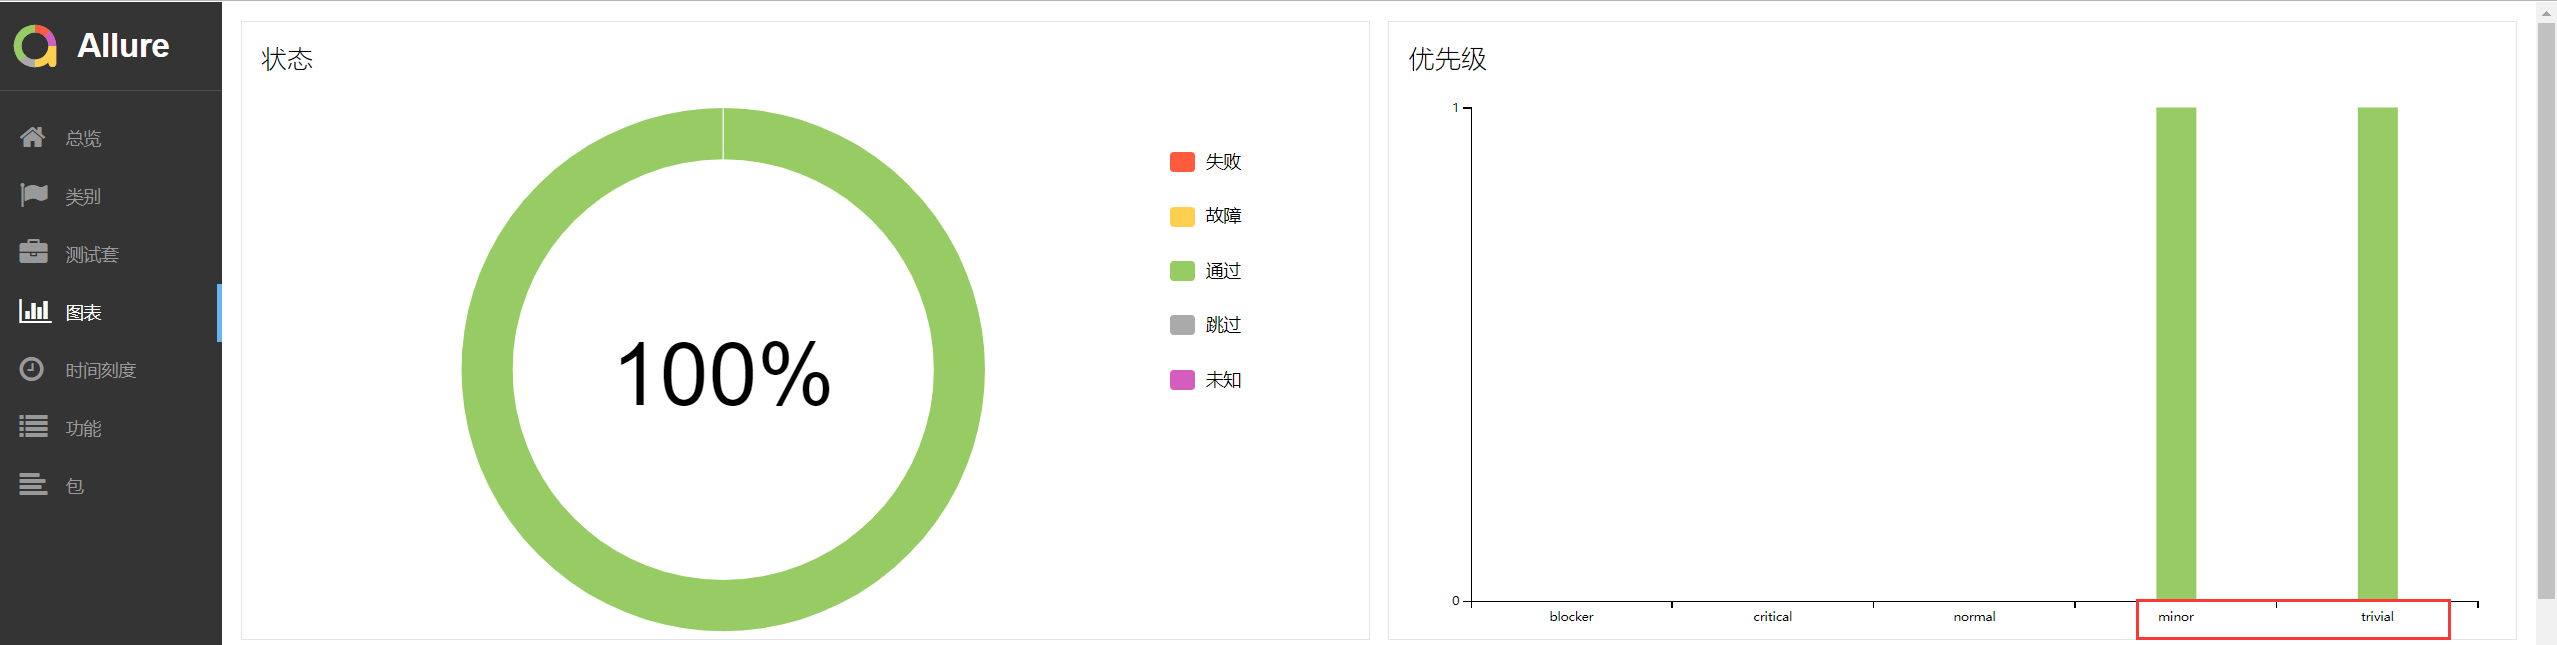
一、feature: 标注主要功能模块。
二、story: 标注Features功能模块下的分支功能。
三、severity: 标注测试用例的重要级别。
1)blocker级别:中断缺陷(客户端程序无响应,无法执行下一步操作)
2)critical级别:临界缺陷(功能点缺失)
3)normal级别:正常 默认为这个级别
4)minor级别:次要缺陷(界面错误与UI需求不符)
5)trivial级别:轻微缺陷(必输项无提示,或者提示不规范)
四、step: 标注测试用例的重要步骤。
五、attach:用于向测试报告中输入一些附加的信息,通常是一些测试数据信息。
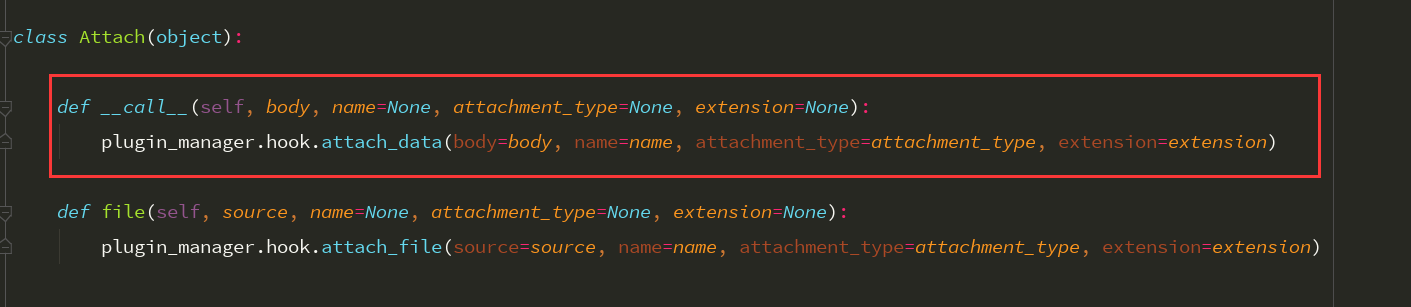
1)name就是附件名称,body就是数据,attachment_type就是传类型
2)附件支持的类型(TEXT,HTML,XML,PNG,JPG,JSON,OTHER)
六、issue:这里传的是一个连接,记录的是你的问题。
七、testcase:这里传的是一个连接,记录的是你的用例。
八、description:描述用例信息
第2步:代码展示+报表展示
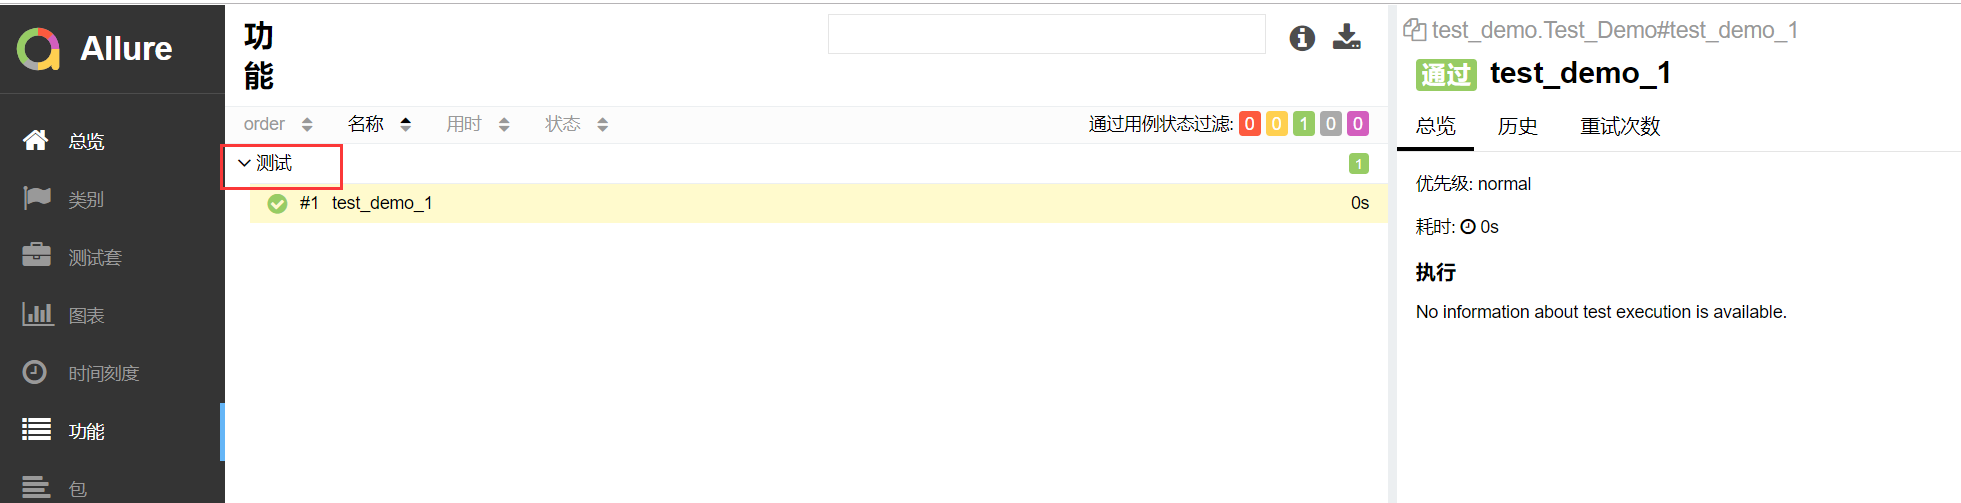
feature方法的演示
代码:
 1 import pytest,allure
 2 @allure.feature("测试")      #标记代码
 3 class Test_Demo():
 4
 5     # @allure.story("test_demo_1")
 6     # @allure.severity("trivial")
 7     def test_demo_1(self):
 8         # """
 9         # 用例描述:22222222222222
10         # """
11         #allure.MASTER_HELPER.description("11111111111111")
12         assert 1 == 1
报告展示:

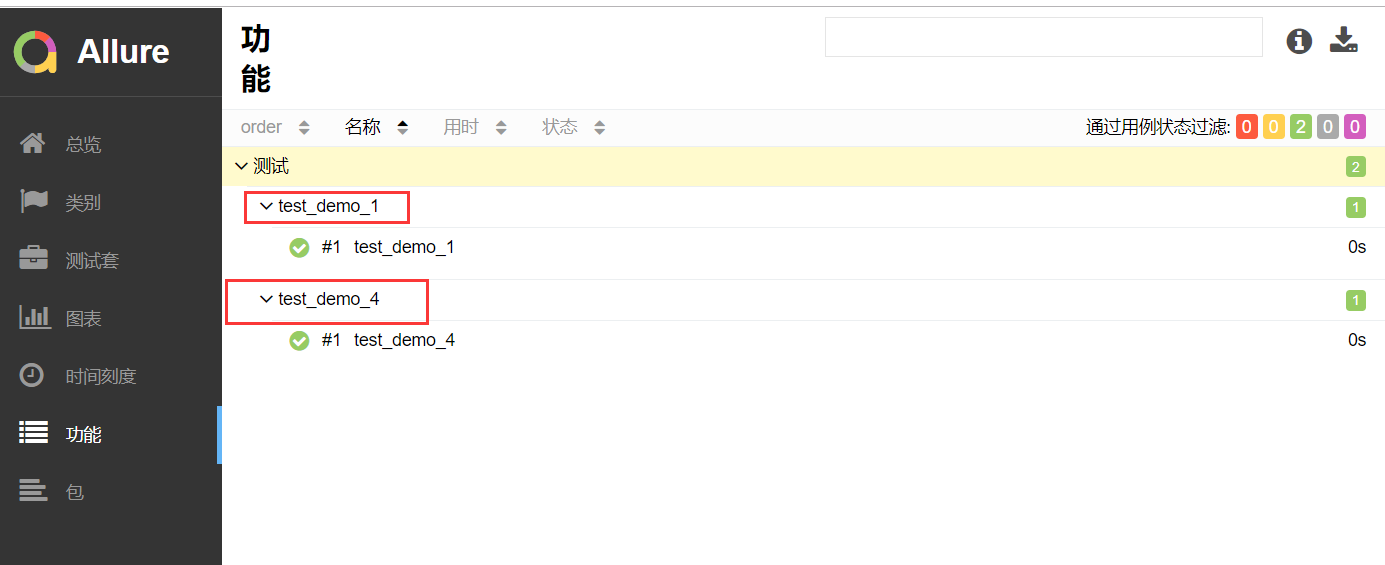
story方法的演示
代码:
 1 import pytest,allure
 2 @allure.feature("测试")
 3 class Test_Demo():
 4
 5     @allure.story("test_demo_1")      #标记代码
 6     # @allure.severity("trivial")
 7     def test_demo_1(self):
 8         # """
 9         # 用例描述:22222222222222
10         # """
11         #allure.MASTER_HELPER.description("11111111111111")
12         assert 1 == 1
13     @allure.story("test_demo_4")       #标记代码
14     #@allure.severity("minor")
15     def test_demo_4(self):
16         assert 3 == 3
报告展示:
severity方法的演示:
代码:
 1 import pytest,allure
 2 @allure.feature("测试")
 3 class Test_Demo():
 4
 5     #@allure.story("test_demo_1")
 6     @allure.severity("trivial")           #标记代码
 7     def test_demo_1(self):
 8         # """
 9         # 用例描述:22222222222222
10         # """
11         #allure.MASTER_HELPER.description("11111111111111")
12         assert 1 == 1
13     #@allure.story("test_demo_4")
14     @allure.severity("minor")              #标记代码
15     def test_demo_4(self):
16         assert 3 == 3
报告展示:
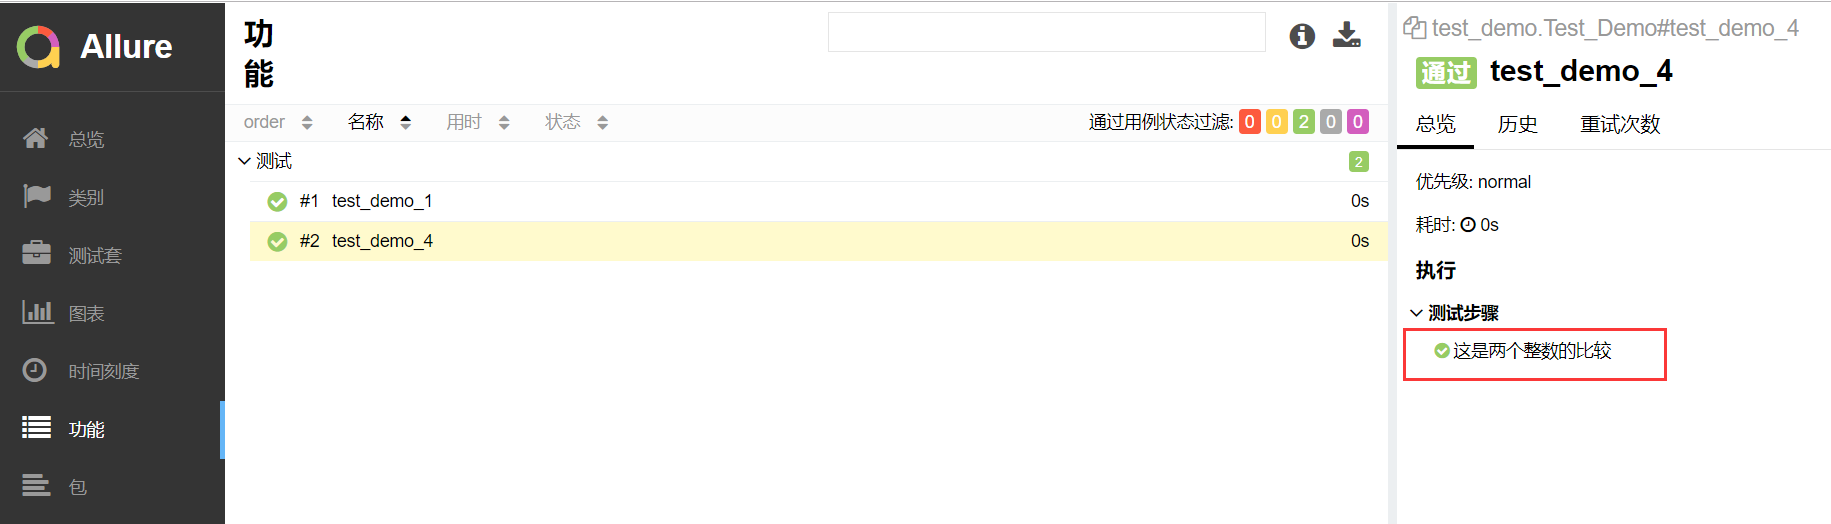
setp方法的演示:
1.总的步骤备注
代码:
 1 import pytest,allure
 2 @allure.feature("测试")
 3 class Test_Demo():
 4
 5     #@allure.story("test_demo_1")
 6     #@allure.severity("trivial")
 7     @allure.step("这是两个负数的比较")      #标记代码
 8     def test_demo_1(self):
 9         # """
10         # 用例描述:22222222222222
11         # """
12         #allure.MASTER_HELPER.description("11111111111111")
13         assert -1 == -1
14     #@allure.story("test_demo_4")
15     #@allure.severity("minor")
16     @allure.step("这是两个整数的比较")      #标记代码
17     def test_demo_4(self):
18         assert 3 == 3
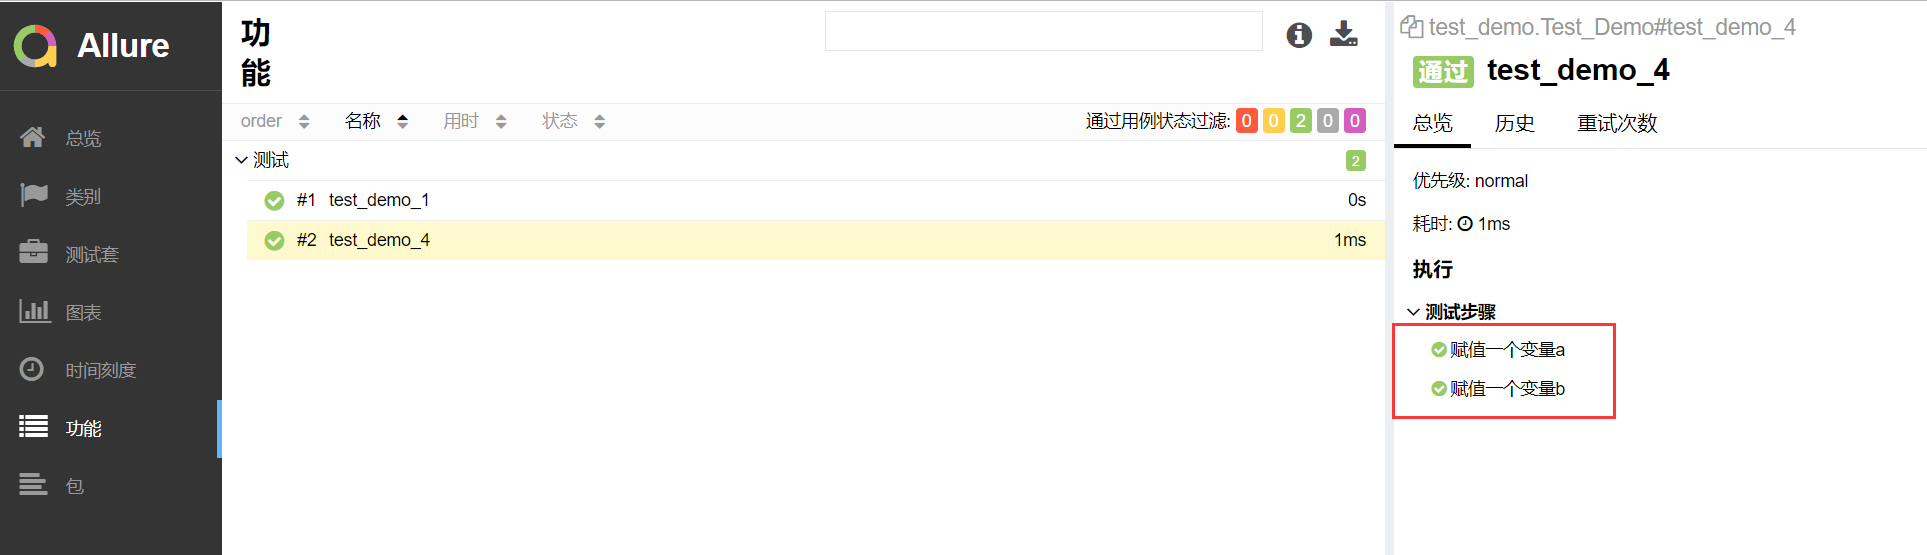
报告展示:
2.分步骤备注
代码:
 1 import pytest,allure
 2 @allure.feature("测试")
 3 class Test_Demo():
 4
 5     #@allure.story("test_demo_1")
 6     #@allure.severity("trivial")
 7     #@allure.step("这是两个负数的比较")
 8     def test_demo_1(self):
 9         # """
10         # 用例描述:22222222222222
11         # """
12         #allure.MASTER_HELPER.description("11111111111111")
13         assert -1 == -1
14     #@allure.story("test_demo_4")
15     #@allure.severity("minor")
16     #@allure.step("这是两个整数的比较")
17     def test_demo_4(self):
18         with allure.step("赋值一个变量a"):     #标记代码
19             a=1
20         with allure.step("赋值一个变量b"):     #标记代码
21             b=1
22         assert a == b
报表展示:
attach方法的演示:
代码:
1 import pytest,allure
2 @allure.feature("测试")
3 class Test_Demo():
4
5 #@allure.story("test_demo_1")
6 #@allure.severity("trivial")
7 #@allure.step("这是两个负数的比较")
8 def test_demo_1(self):
9 # """
10 # 用例描述:22222222222222
11 # """
12 #allure.MASTER_HELPER.description("11111111111111")
13 assert -1 == -1
14 #@allure.story("test_demo_4")
15 #@allure.severity("minor")
16 #@allure.step("这是两个整数的比较")
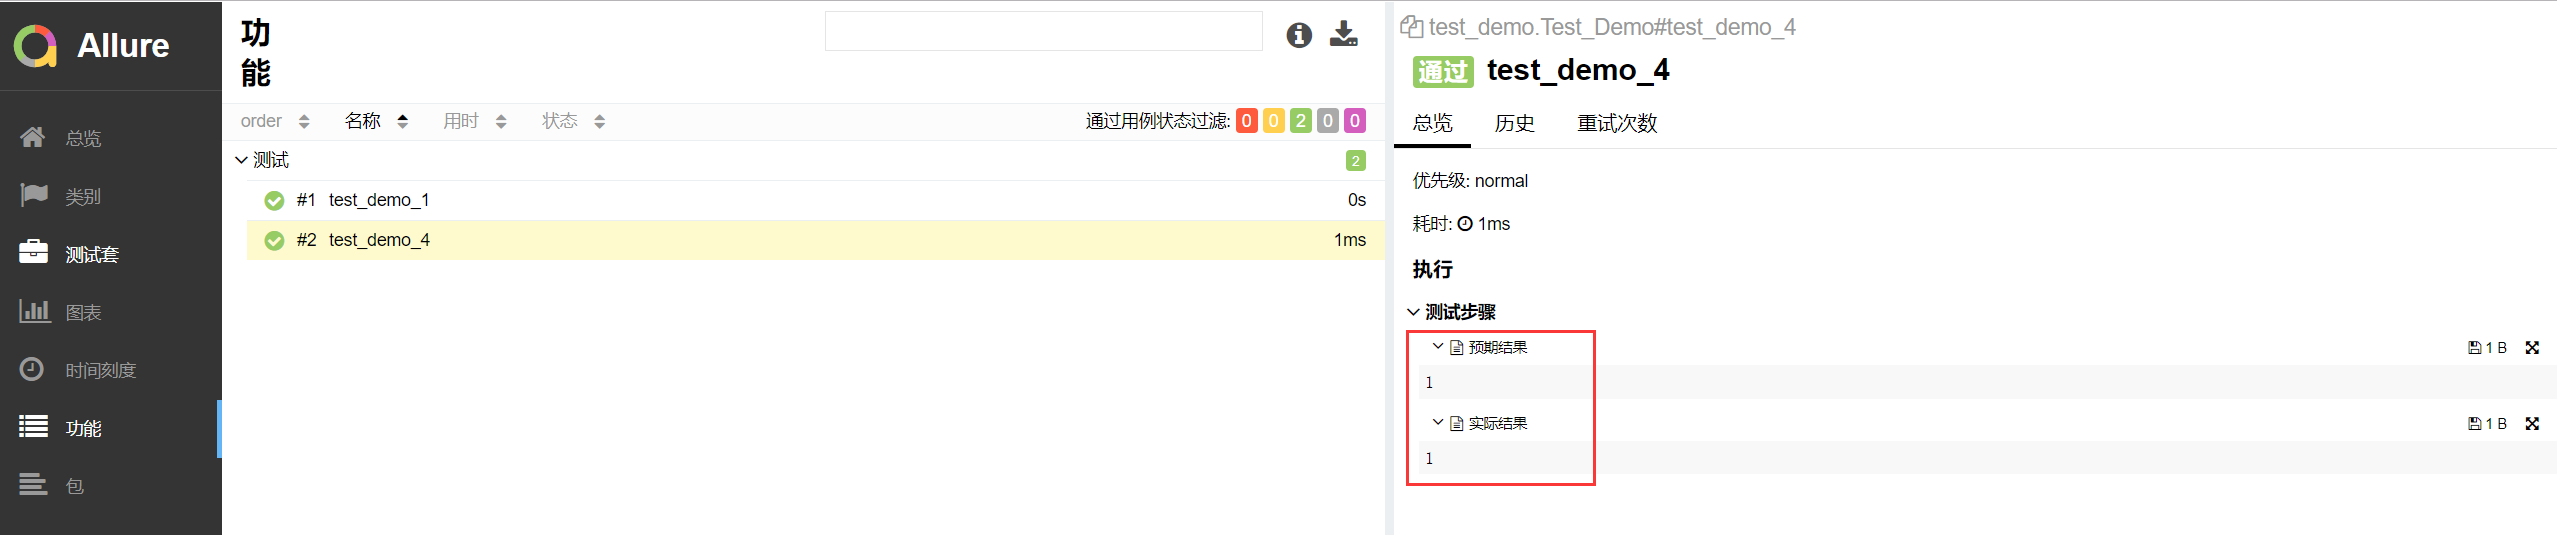
17 def test_demo_4(self):
18 a = 1
19 allure.attach("{0}".format(a),"预期结果") #标记代码 第一个参数是body,第二个参数是name
20 b=1
21 allure.attach("{0}".format(b),"实际结果") #标记代码
22 assert a == b
报告展示:
图片附件形式:
代码:
 1 import pytest,allure
 2 @allure.feature("测试")
 3 class Test_Demo():
 4
 5     @allure.story("test_demo_1")
 6     @allure.severity("trivial")
 7     def test_demo_1(self):
 8         assert 1 == 1
 9
10     def test_demo_3(self):
11         """
12             用例描述:这里是两个数字是否相等
13         """
14         a = 3
15         b = 3
16         with open(r"G:\Web_automation\Learn_pytest\test_cases\img\2.jpg","rb") as file:          #标记代码,需要先打开图片
17             file=file.read()                                          #标记代码,读取图片
18             allure.attach(file,"预期结果",attachment_type=allure.attachment_type.JPG)        #标记代码
19         assert a == b
报告展示:

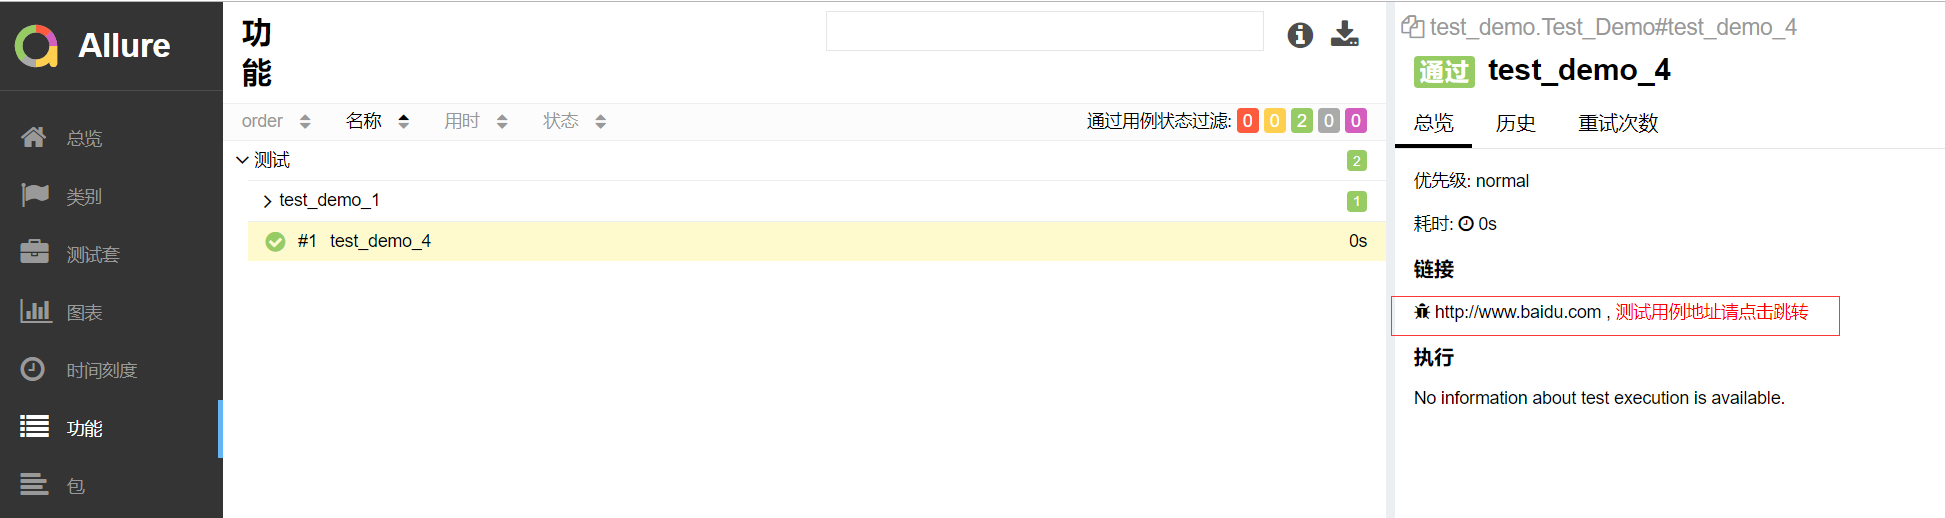
issue和testcase方法的演示:
代码:
1 import pytest,allure
 2 @allure.feature("测试")
 3 class Test_Demo():
 4
 5     @allure.story("test_demo_1")
 6     @allure.testcase("https://home.cnblogs.com/")
 7     def test_demo_1(self):
 8         assert 1 == 1
 9
10     @allure.testcase("https://home.cnblogs.com/","测试用例地址请点击跳转")     #标记代码,你可以指定连接的名字,报告里面就会现在这个名字的连接
11     @allure.issue("http://www.baidu.com")                     #标记代码,哪个写在后,在报告里面就会显示在前面
12     def test_demo_4(self):
13          assert 3 == 3
报表展示:
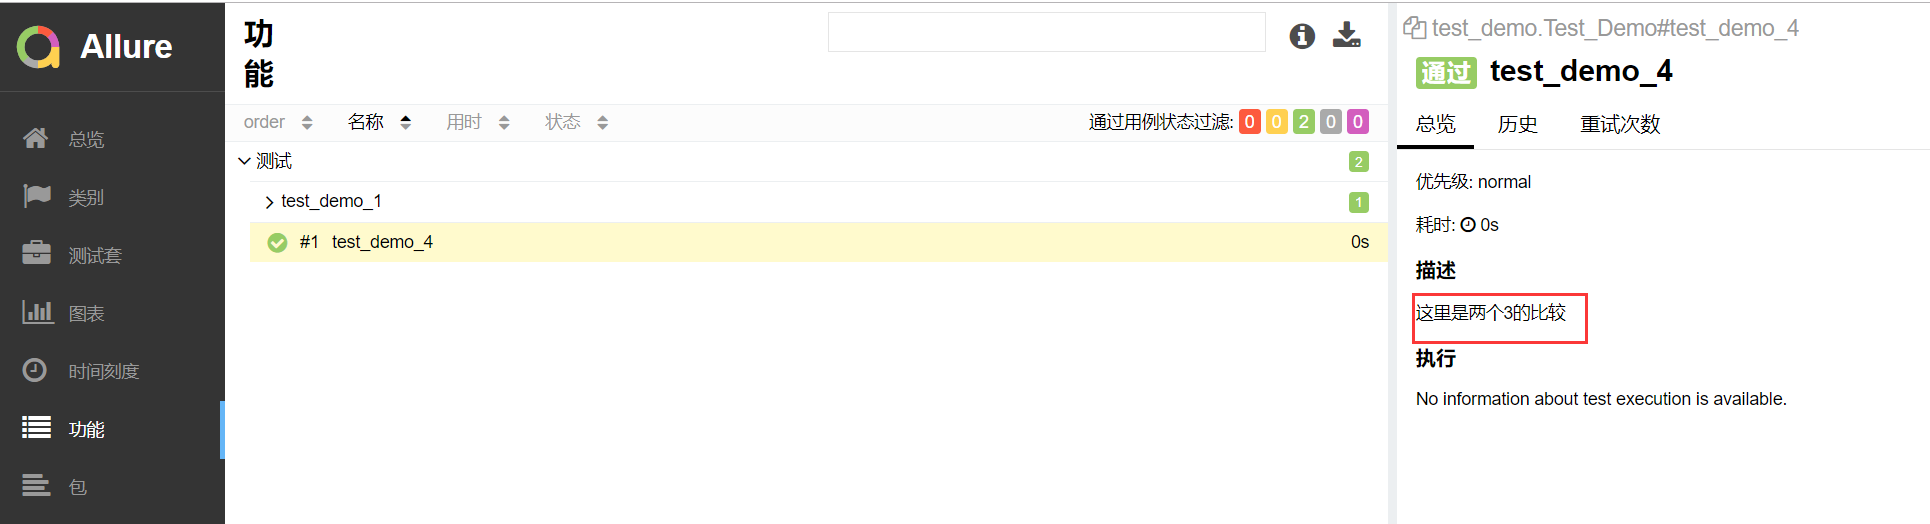
description方法的演示:
代码:(这两种备注方式不能同时是存在,如果同时存在他会先使用description的,而不取3引号的)
 1 import pytest,allure
 2 @allure.feature("测试")
 3 class Test_Demo():
 4
 5
 6     @allure.story("test_demo_1")
 7     @allure.testcase("https://home.cnblogs.com/")
 8     def test_demo_1(self):
 9         assert 1 == 1
10
11     @allure.description("这里是两个3的比较")             #标记代码,优先取这个
12     def test_demo_4(self):
13         """
14             用例描述:这里是两个数字是否相等         #如果没有description,那么就取3引号的
15         """
16         assert 3 == 3
报告演示:
四.报告显示
报告显示方法一:
第1步:以上运行之后,可以在CMD中运行命令
allure generate report -o html --clean
report是alluredir生成的xml目录,html是最终生成html的目录
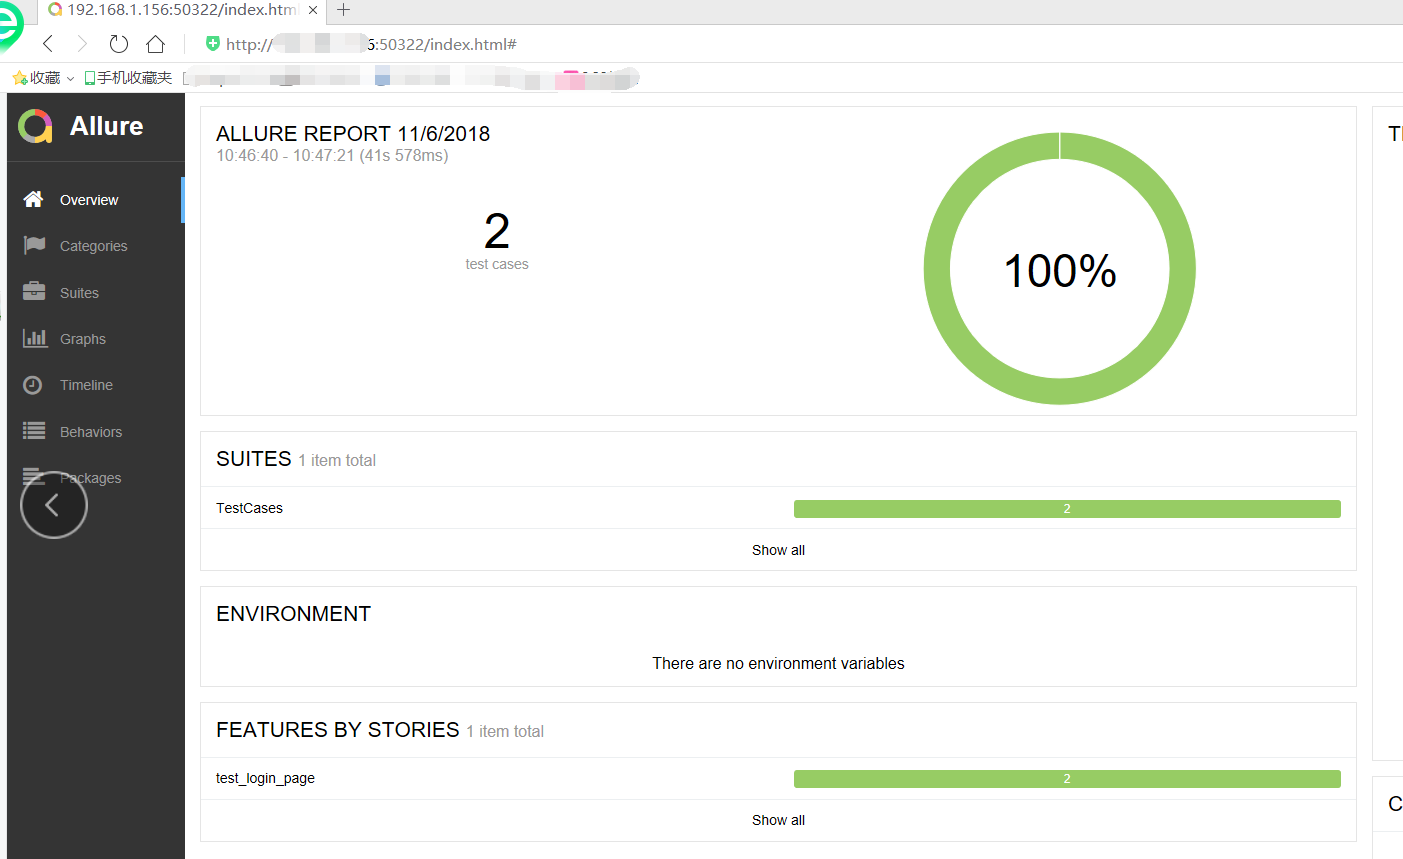
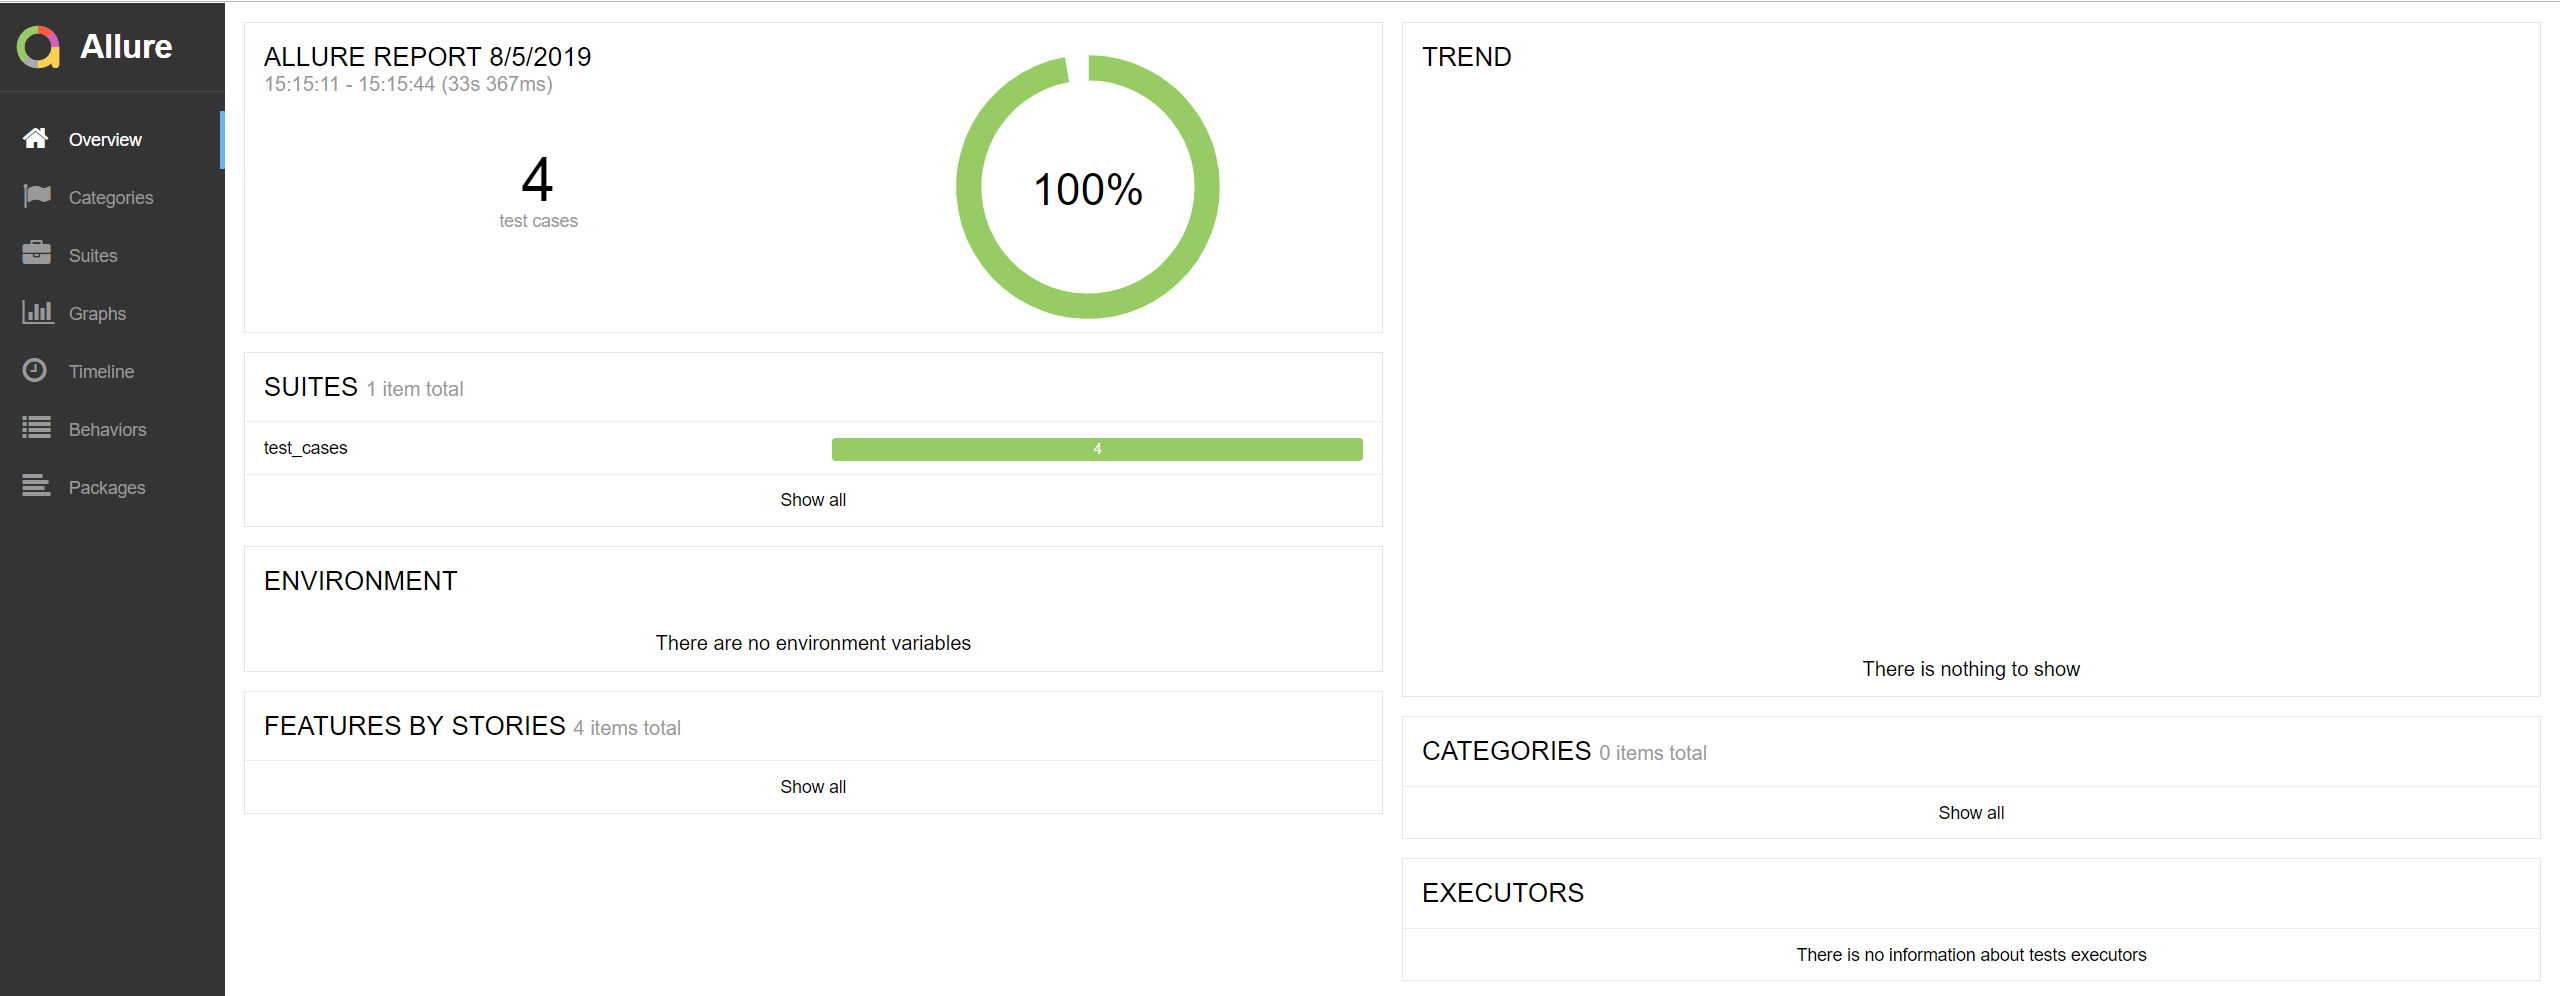
第2步:运行命令后,可以在html路径下看到生成的数据,其中index.html就是我们要的allure报告,你可以在pycharm里面打开,报告展示如下
报告显示方法二(这种相当于是调试):
第1步:以上运行之后,可以在CMD中运行命令
allure serve report (report是alluredir生成的xml目录)
运行后,浏览器会自动跳转到allure report界面
四.pytest+allure+jenkins集成
参考我另外的一个博客文章:https://www.cnblogs.com/hao2018/p/11135180.html
注意:在本地运行的时候需要手动把代码拷贝到jenkins目录下面的workspace文件夹里面;如果在git或svn上运行,jekins会直接把代码拷贝到workspace目录 ,如果jenkins是指定工作目录就不用管了
欢迎来到testingpai.com!
注册 关于