背景
在我们执行自动化脚本的时候,经常我们需要在不同的环境之间切换,比如:测试环境<->预发布环境<->生产环境,而一般我们的代码上传到版本控制系统(Git or SVN),通过Jenkins持续集成构建我们的job。一旦环境发生了变化,又或者是我们要执行的用例集发生了变化,我们需要改动项目的配置,重新将代码上传至版本控制系统重新构建,整个流程下来比较浪费时间。Jenkins的参数化构建可以完美解决这一问题,只需要在job构建前选择/填写对应的配置,job可以按照不同的配置执行。
Jenkins任务配置
这里以V2.264 Jenkins版本为例:
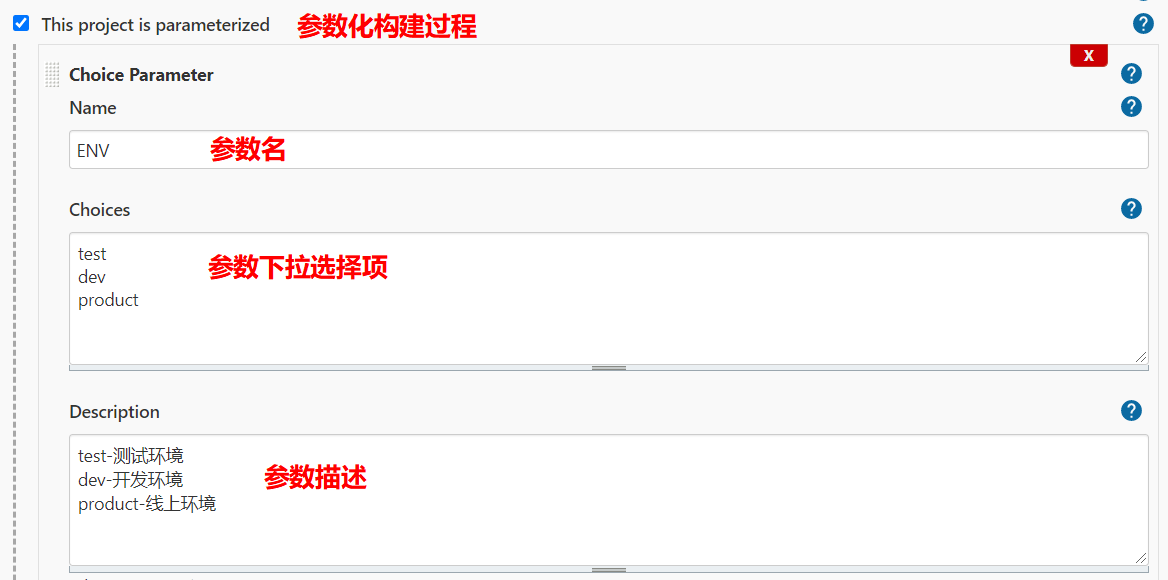
Step1:进入任务配置页面->【General】
选择参数配置(Choice Parameter):
Step2:选择【构建】选项
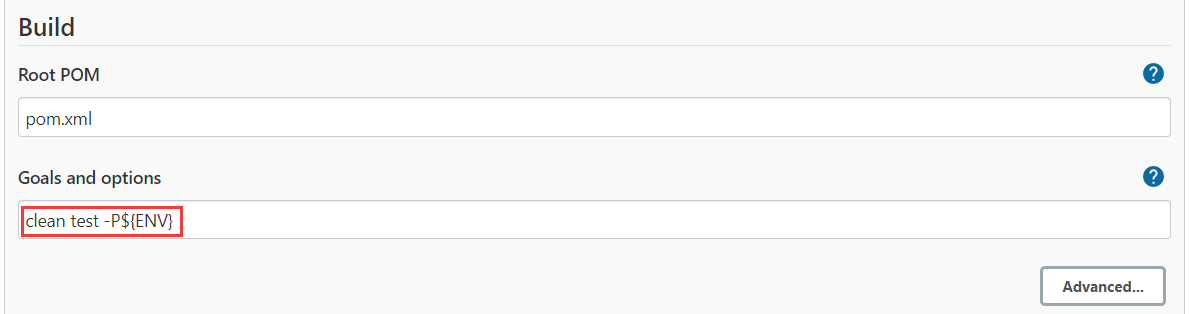
- 如果Jenkins选择的是Maven风格任务,则配置如下:
 其中${ENV}表示引用之前ENV变量的值,-P参数可以在Maven项目构建的时候传递值进去。
 - 如果是选择free style(自由风格)任务,选择【Execute Windows batch command】执行Windows批处理命令,填写如下配置,其中%ENV%也表示引用ENV变量的值
 其中${ENV}表示引用之前ENV变量的值,-P参数可以在Maven项目构建的时候传递值进去。
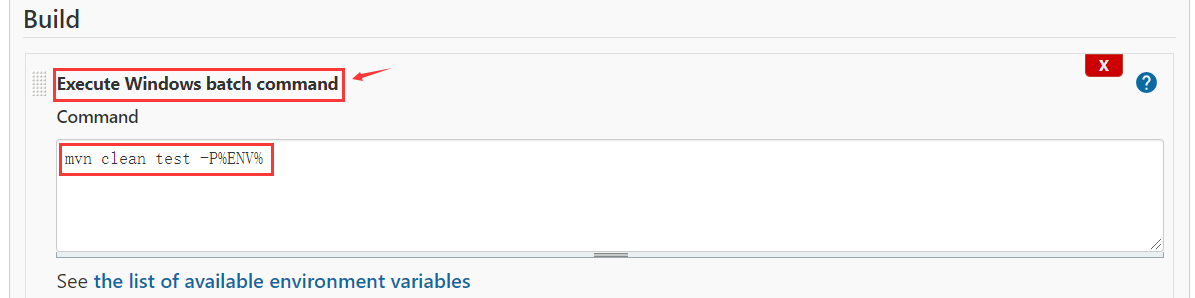
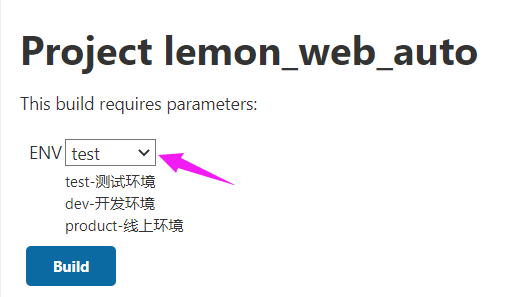
上述准备工作做好之后,我们回到Jenkins的首页,选择job下拉即可看到:【build with Parameters】选项
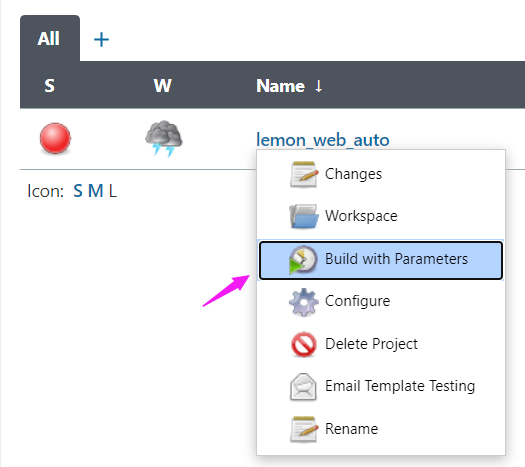
选中进入job页面,即可选择不同的选项执行job:
Maven项目配置
现在我们在Jenkins的job里面配置了参数,通过mvn clean test -P${ENV}可以将参数传递给Maven工程,如果我们的代码需要通过这个参数执行目前是不行的,因为没有将参数传给代码。接下来讲解如何在代码中拿到Maven构建命令传递过来的参数。
Step1:配置pom.xml文件
进入Maven的pom.xml文件中,在project标签下添加如下配置:
<!-- 不同的测试环境 -->
    <profiles>
        <!-- 开发环境 -->
        <profile>
            <id>dev</id>
            <properties>
                <env>dev</env>
            </properties>
        </profile>

        <!-- 测试环境 -->
        <profile>
            <id>test</id>
            <properties>
                <env>test</env>
            </properties>
            <activation>
                <activeByDefault>true</activeByDefault><!--默认启用环境配置-->
            </activation>
        </profile>

        <!-- 线上环境 -->
        <profile>
            <id>product</id>
            <properties>
                <env>product</env>
            </properties>
        </profile>
    </profiles>
之前在Jenkins job里面配置的构建参数-P对应的值,此时就可以通过Maven项目的profile接收。
profile的id对应参数-P的值,如之前传递的是dev值进来,那么命中的是第一个profile,所以Maven项目中环境变量env将会被赋值为dev。
在Maven的pom.xml文件中的build标签下添加如下配置:
<resources>
	<resource>
		<directory>src/main/resources</directory>
		<filtering>true</filtering>
		<!--扫描替换参数的文件路径-->
	</resource>
</resources>
<filters>
	<filter>src/main/filters/filter-${env}.properties</filter>
	<!--环境过滤器的配置方式,回头需要在该路径下建立对应文件-->
</filters>
Step2:添加properties文件
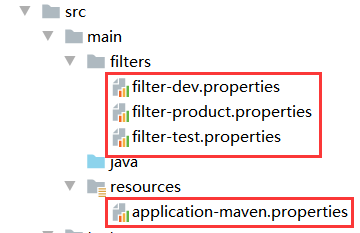
在项目src/main/java目录下新建filters目录,添加filter-dev.properties、filter-product.properties、filter-test.properties三支配置文件,配置内容参考:
Environment=dev
host=http://127.0.0.1
port=8081
jdbc-url=xxxx
jdbc-username=xxxx
jdbc-password=xxxx
在src/main/resources目录下新建application-maven.properties文件
server.port=${port}
# Environment
Environment=${Environment}
Host.url=${host}
# 数据源配置
datasource.url=${jdbc-url}
datasource.username==${jdbc-usernamel}
datasource.password==${jdbc-password}
datasource.driver-class-name=com.mysql.cj.jdbc.Driver
Step3:在测试代码中读取配置
Properties properties = new Properties();
try {
	properties.load(ClassLoader.class.getResourceAsStream("/application-maven.properties"));
} catch (IOException e) {
	e.printStackTrace();
}
String value = properties.getProperty("Environment");
上述工作完毕之后将maven工程代码重新推送到版本控制系统(Git or SVN),再回到Jenkins的首页选择对应的任务即可执行参数化构建。
欢迎来到testingpai.com!
注册 关于