相信很多同学都已经知道,如何搭建ngrinder性能测试环境,那么这一次,我们就直接从创建脚步开始讲起。这一次我们讲解一个登录接口,账户和密码,从mysql数据库中获取。
点击顶部的【脚本】菜单,然后再“创建脚本”。选择“Groovy Maven Project”
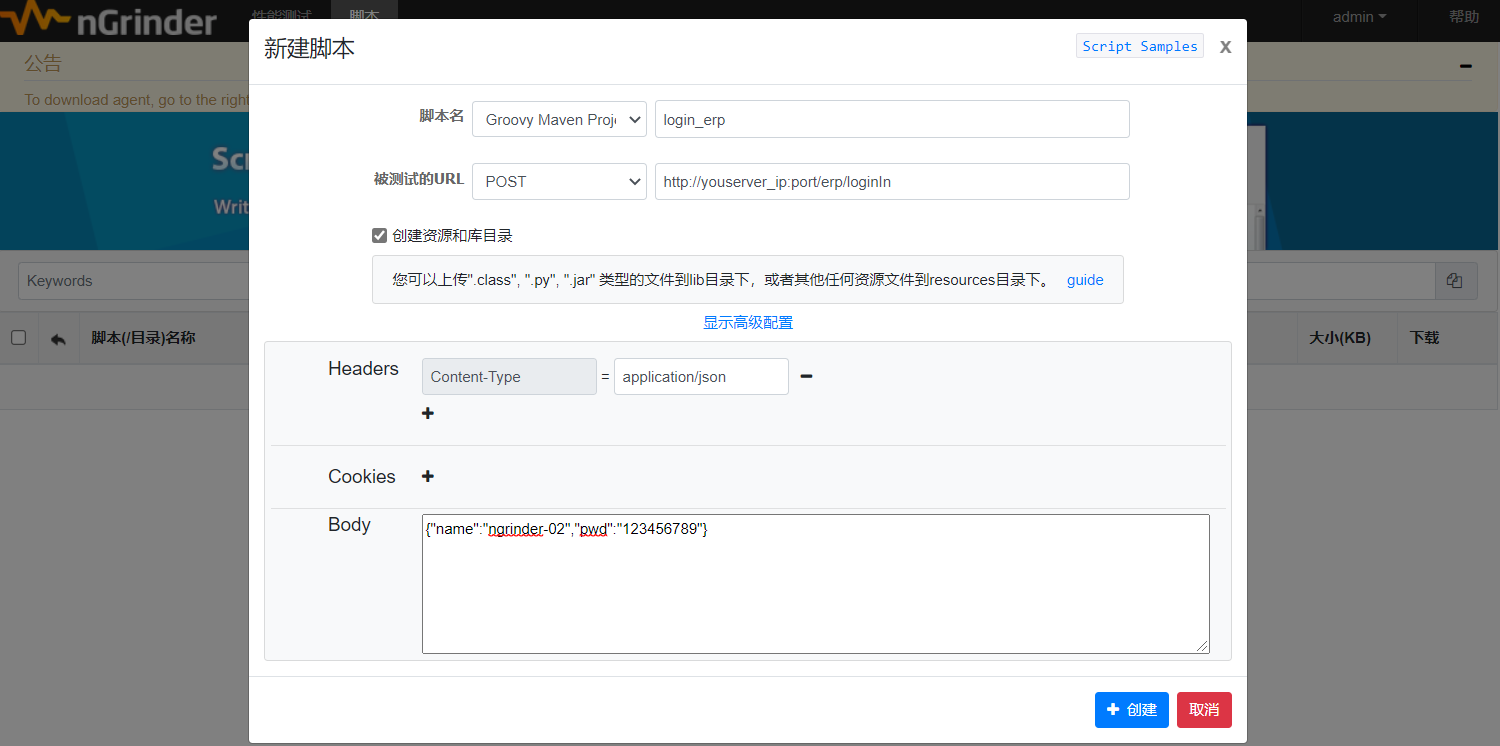
点击创建按钮,生成脚本。
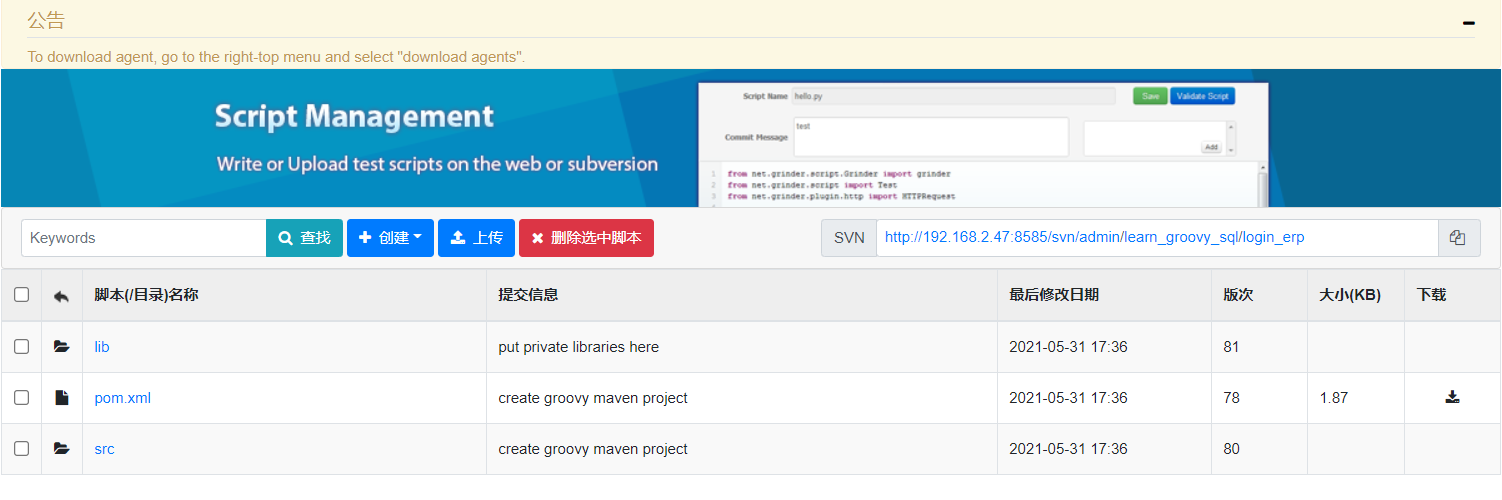
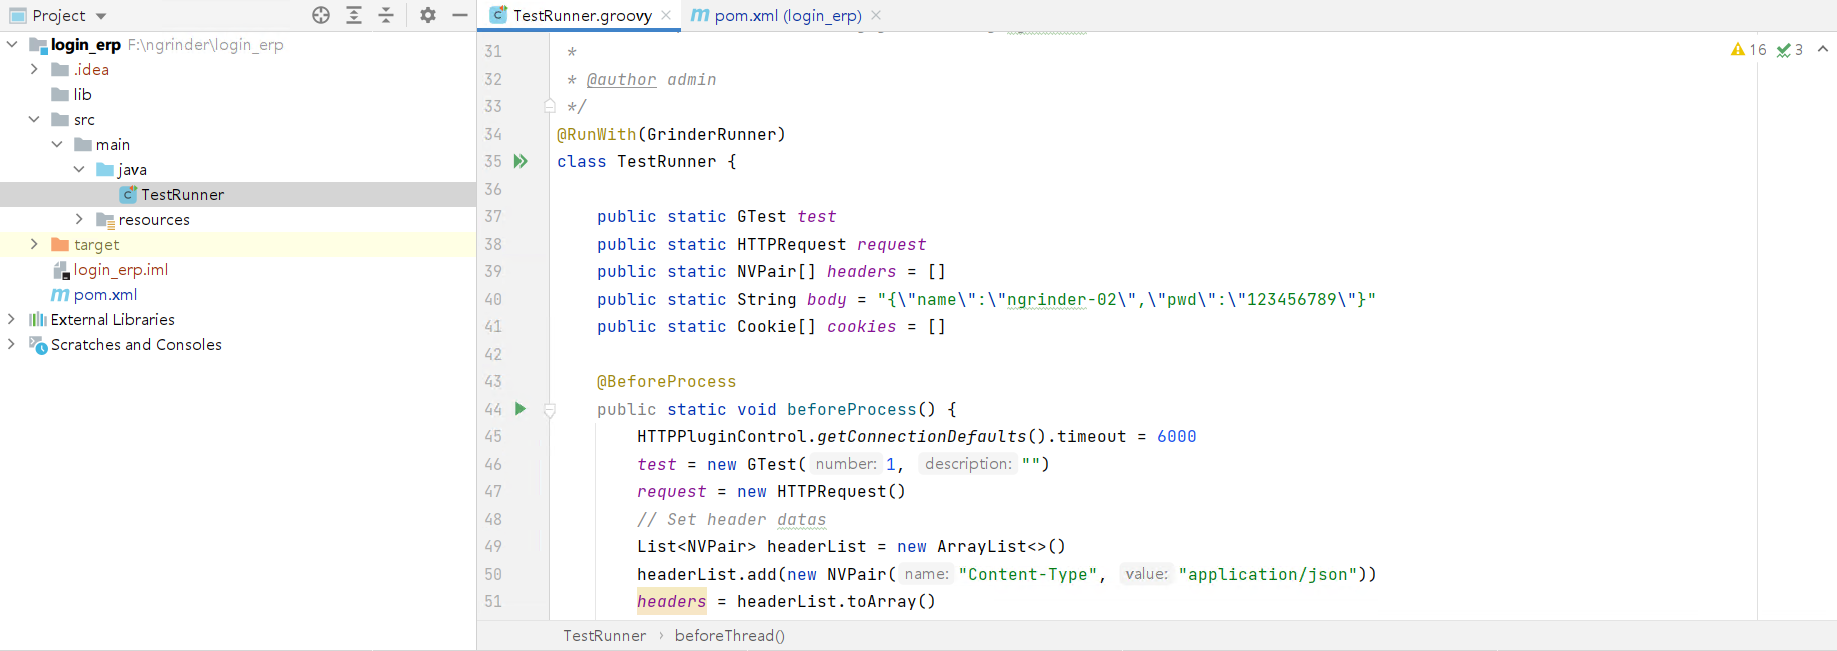
然后使用svn下载生成的源代码,使用idea工具打开项目,在idea工具中配置maven home path。然后找到Testrunner.groovt文件打开。
打开maven仓库网站,搜索mysql数据库的连接配置
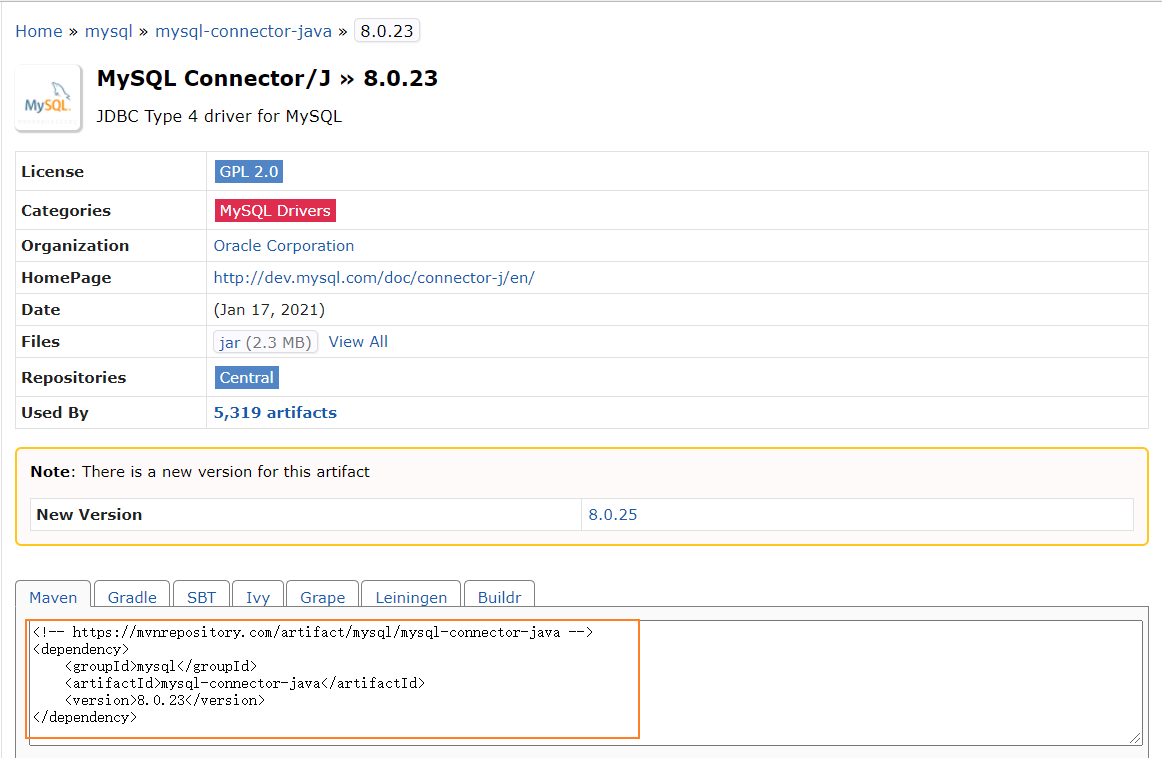
复制maven配置信息,粘贴到工程的pom.xml文件中
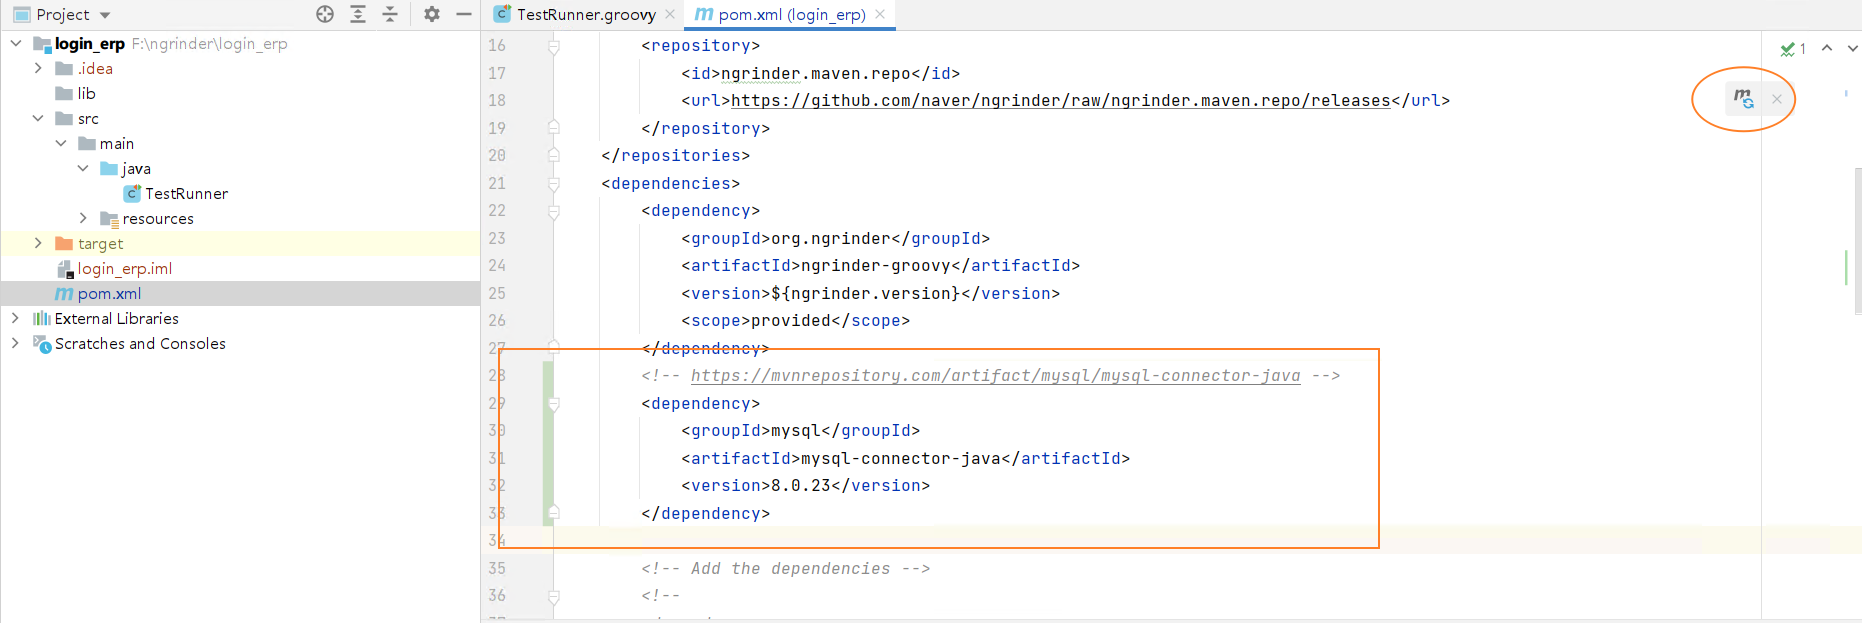
点击右上角的刷新图标,重新加载这个文件。
然后在TestRunner.groovy这个脚本的头部信息里面添加如下脚本:
// 定义sql连接数据库的对象
public static Sql sql = Sql.newInstance("jdbc:mysql://You_MysqlIp:port/erp",
		"You_user",
		"You_password",
		"com.mysql.cj.jdbc.Driver")
在@BeforeProcess中添加执行的sql查询语句
// 定义查询语句的执行结果, sqlresult是一个map
def sqlresult = sql.rows("select name,pwd from `user` limit 100;")
再定义两个变量接收查询结果。
// 定义两个字符串列表,接收 账号和密码
public static String[] sql_name, sql_pwd

// @BeforeProcess 中添加
// 获取map中 name 和 pwd 的值
	sql_name = sqlresult.name
	sql_pwd = sqlresult.pwd
然后再在@Before中,重构请求body
// @Before中
// 移动body, 重新生成body
body = "{\"name\":\"${sql_name[0]}\",\"pwd\":\"${sql_pwd[0]}\"}"
最后再把登录接口响应打印出来,看是否有登录成功
// @Test中
grinder.logger.info(result.text)
整体修改之后脚本如下
import groovy.sql.Sql

import static net.grinder.script.Grinder.grinder
import static org.junit.Assert.*
import static org.hamcrest.Matchers.*
import net.grinder.plugin.http.HTTPRequest
import net.grinder.plugin.http.HTTPPluginControl
import net.grinder.script.GTest
import net.grinder.script.Grinder
import net.grinder.scriptengine.groovy.junit.GrinderRunner
import net.grinder.scriptengine.groovy.junit.annotation.BeforeProcess
import net.grinder.scriptengine.groovy.junit.annotation.BeforeThread
// import static net.grinder.util.GrinderUtils.* // You can use this if you're using nGrinder after 3.2.3
import org.junit.Before
import org.junit.BeforeClass
import org.junit.Test
import org.junit.runner.RunWith

import java.util.Date
import java.util.List
import java.util.ArrayList

import HTTPClient.Cookie
import HTTPClient.CookieModule
import HTTPClient.HTTPResponse
import HTTPClient.NVPair

/**
 * A simple example using the HTTP plugin that shows the retrieval of a
 * single page via HTTP.
 *
 * This script is automatically generated by ngrinder.
 *
 * @author admin
 */
@RunWith(GrinderRunner)
class TestRunner {

	public static GTest test
	public static HTTPRequest request
	public static NVPair[] headers = []
	public static String body
//			= "{\"name\":\"ngrinder-02\",\"pwd\":\"123456789\"}"
	public static Cookie[] cookies = []
	// 定义sql连接数据库的对象
	public static Sql sql = Sql.newInstance("jdbc:mysql://You_MysqlIp:port/erp",
			"You_user",
			"You_password",
			"com.mysql.cj.jdbc.Driver")
	// 定义两个字符串列表,接收 账号和密码
	public static String[] sql_name, sql_pwd

	@BeforeProcess
	public static void beforeProcess() {
		// 定义查询语句的执行结果, sqlresult是一个map
		def sqlresult = sql.rows("select name,pwd from `user` limit 100;")
		println(sqlresult)
		// 获取map中 name 和 pwd 的值
		sql_name = sqlresult.name
		sql_pwd = sqlresult.pwd
		HTTPPluginControl.getConnectionDefaults().timeout = 6000
		test = new GTest(1, "")
		request = new HTTPRequest()
		// Set header datas
		List<NVPair> headerList = new ArrayList<>()
		headerList.add(new NVPair("Content-Type", "application/json"))
		headers = headerList.toArray()
		grinder.logger.info("before process.");
	}

	@BeforeThread
	public void beforeThread() {
		test.record(this, "test")
		grinder.statistics.delayReports=true;
		grinder.logger.info("before thread.");
	}

	@Before
	public void before() {
		request.setHeaders(headers)
		cookies.each { CookieModule.addCookie(it, HTTPPluginControl.getThreadHTTPClientContext()) }
		// 移动body, 重新生成body
		body = "{\"name\":\"${sql_name[0]}\",\"pwd\":\"${sql_pwd[0]}\"}"
		println(body)
		grinder.logger.info("before. init headers and cookies");
	}

	@Test
	public void test(){
		HTTPResponse result = request.POST("http://Youserver_ip:port/erp/loginIn", body.getBytes())
		// 打印结果
		grinder.logger.info(result.text)

		if (result.statusCode == 301 || result.statusCode == 302) {
			grinder.logger.warn("Warning. The response may not be correct. The response code was {}.", result.statusCode);
		} else {
			assertThat(result.statusCode, is(200));
		}
	}
}
然后再在idea工具中配置TestRunner的configuration,在本地搜索grinder-dcr-agent-3.9.1.jar,然后把路径 -ea -javaagent:Youself_path\net\sf\grinder\grinder-dcr-agent\3.9.1\grinder-dcr-agent-3.9.1.jar写入如下:

运行结果如图:

脚本调试成功,现在就要进行脚本性能转换。
我们需要定义三个变量,分别来接收从数据库取回来的行总数,以及运行的次数,以及运行次数与对应的行数。
public static Integer maxrow, runno, usrindex

// 在@BeforeProcess中添加
// 数据库实际返回的行数
maxrow = sqlresult.size()
接下来我们再在@Before添加一个逻辑运算就可以了
// @Before中添加
// 获取当前运行次数
	runno = grinder.runNumber
// 判断 运行时应该取第几行值
	if (runno < maxrow) {
		usrindex = runno
	}else {
		usrindex = runno % maxrow
	}
修改后脚本如下:
import groovy.sql.Sql

import static net.grinder.script.Grinder.grinder
import static org.junit.Assert.*
import static org.hamcrest.Matchers.*
import net.grinder.plugin.http.HTTPRequest
import net.grinder.plugin.http.HTTPPluginControl
import net.grinder.script.GTest
import net.grinder.script.Grinder
import net.grinder.scriptengine.groovy.junit.GrinderRunner
import net.grinder.scriptengine.groovy.junit.annotation.BeforeProcess
import net.grinder.scriptengine.groovy.junit.annotation.BeforeThread
// import static net.grinder.util.GrinderUtils.* // You can use this if you're using nGrinder after 3.2.3
import org.junit.Before
import org.junit.BeforeClass
import org.junit.Test
import org.junit.runner.RunWith

import java.util.Date
import java.util.List
import java.util.ArrayList

import HTTPClient.Cookie
import HTTPClient.CookieModule
import HTTPClient.HTTPResponse
import HTTPClient.NVPair

/**
 * A simple example using the HTTP plugin that shows the retrieval of a
 * single page via HTTP.
 *
 * This script is automatically generated by ngrinder.
 *
 * @author admin
 */
@RunWith(GrinderRunner)
class TestRunner {

	public static GTest test
	public static HTTPRequest request
	public static NVPair[] headers = []
	public static String body
//			= "{\"name\":\"ngrinder-02\",\"pwd\":\"123456789\"}"
	public static Cookie[] cookies = []
	// 定义sql连接数据库的对象
//	public static Sql sql = Sql.newInstance("jdbc:mysql://You_MysqlIp:port/erp",
//			"You_user",
//			"You_password",
//			"com.mysql.cj.jdbc.Driver")
	public static Sql sql = Sql.newInstance("jdbc:mysql://81.69.228.171:3337/erp",
			"root",
			"future@123",
			"com.mysql.cj.jdbc.Driver")
	// 定义两个字符串列表,接收 账号和密码
	public static String[] sql_name, sql_pwd
	public static Integer maxrow, runno, usrindex

	@BeforeProcess
	public static void beforeProcess() {
		// 定义查询语句的执行结果, sqlresult是一个map
		def sqlresult = sql.rows("select name,pwd from `user` limit 100;")
		// 数据库实际返回的行数
		maxrow = sqlresult.size()
		// 获取map中 name 和 pwd 的值
		sql_name = sqlresult.name
		sql_pwd = sqlresult.pwd
		HTTPPluginControl.getConnectionDefaults().timeout = 6000
		test = new GTest(1, "")
		request = new HTTPRequest()
		// Set header datas
		List<NVPair> headerList = new ArrayList<>()
		headerList.add(new NVPair("Content-Type", "application/json"))
		headers = headerList.toArray()
		grinder.logger.info("before process.");
	}

	@BeforeThread
	public void beforeThread() {
		test.record(this, "test")
		grinder.statistics.delayReports=true;
		grinder.logger.info("before thread.");
	}

	@Before
	public void before() {
		request.setHeaders(headers)
		cookies.each { CookieModule.addCookie(it, HTTPPluginControl.getThreadHTTPClientContext()) }
		// 获取当前运行次数
		runno = grinder.runNumber
		// 判断 运行时应该取第几行值
		if (runno < maxrow) {
			usrindex = runno
		}else {
			usrindex = runno % maxrow
		}
		// 移动body, 重新生成body
		grinder.logger.info("=====The runno is {}", runno)
		grinder.logger.info("===---====The userindex is {}", usrindex)
		body = "{\"name\":\"${sql_name[usrindex]}\",\"pwd\":\"${sql_pwd[usrindex]}\"}"
		println(body)
		grinder.logger.info("before. init headers and cookies");
	}

	@Test
	public void test(){
		HTTPResponse result = request.POST("http://81.69.228.171:9090/erp/loginIn", body.getBytes())
		// 打印结果
		grinder.logger.info(result.text)

		if (result.statusCode == 301 || result.statusCode == 302) {
			grinder.logger.warn("Warning. The response may not be correct. The response code was {}.", result.statusCode);
		} else {
			assertThat(result.statusCode, is(200));
		}
	}
}
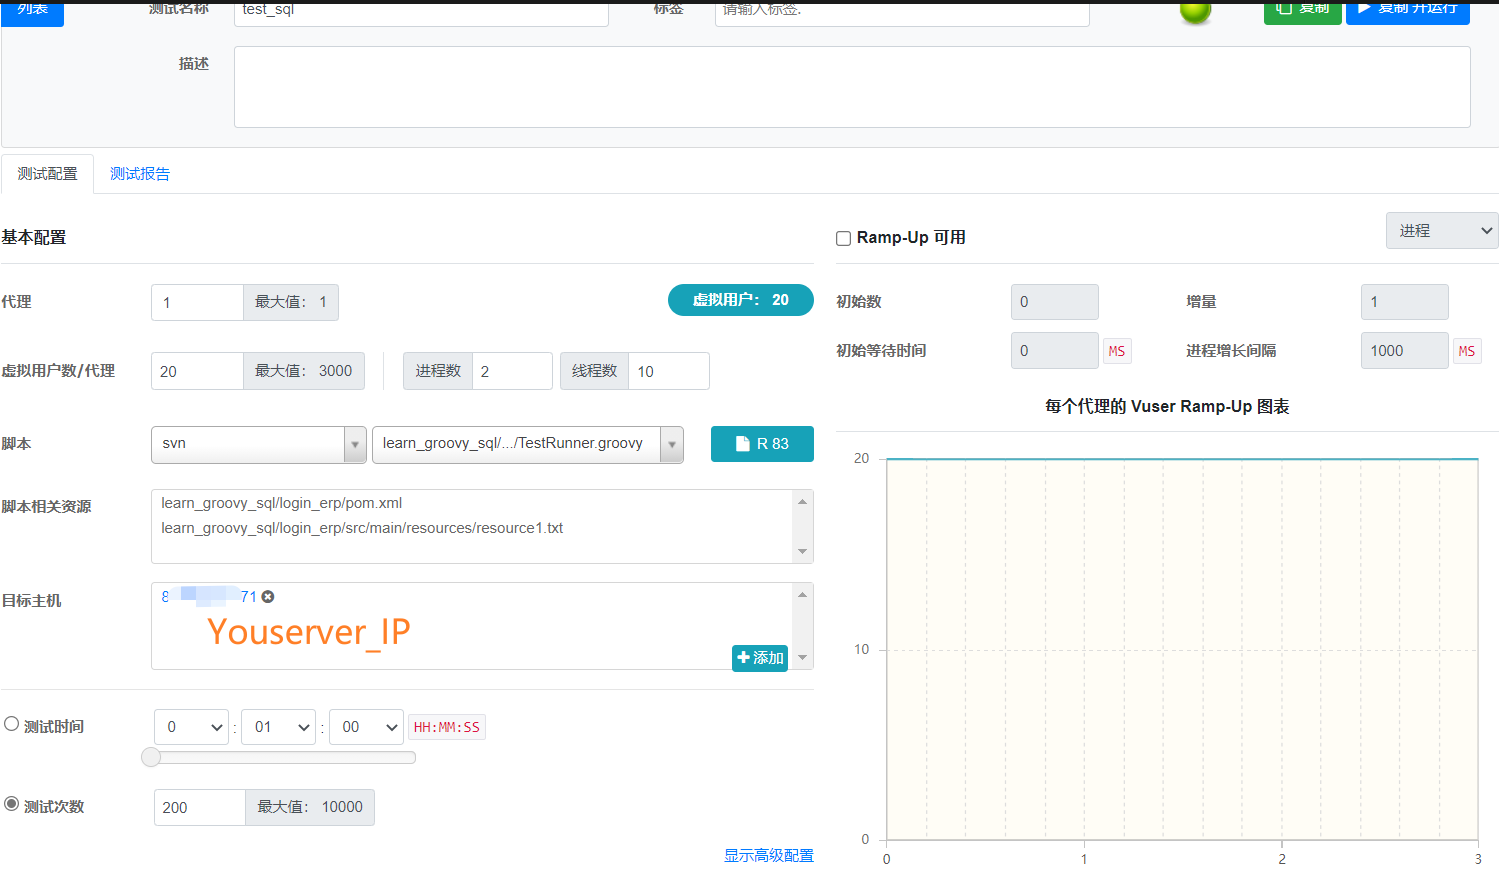
最后再在web管理台中创建新的场景进行新的测试
运行完,查看日志:
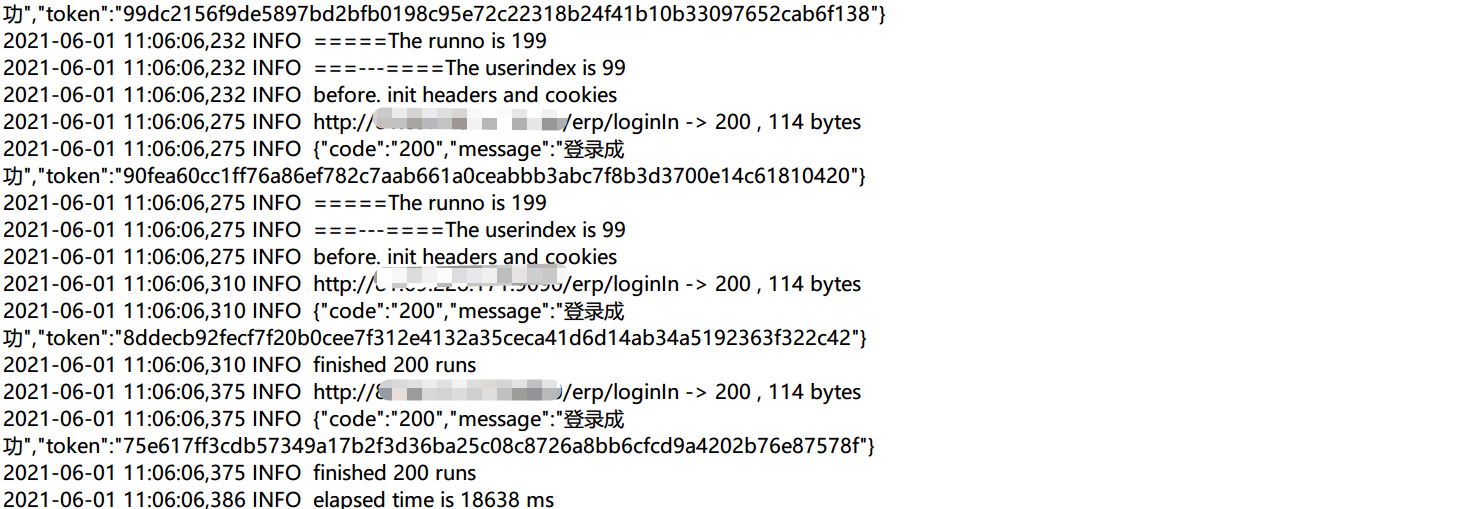
达到了我们预期效果。
好了,从数据库中获取数据进行性能测试,已经讲完了,你掌握了吗?
欢迎来到testingpai.com!
注册 关于